
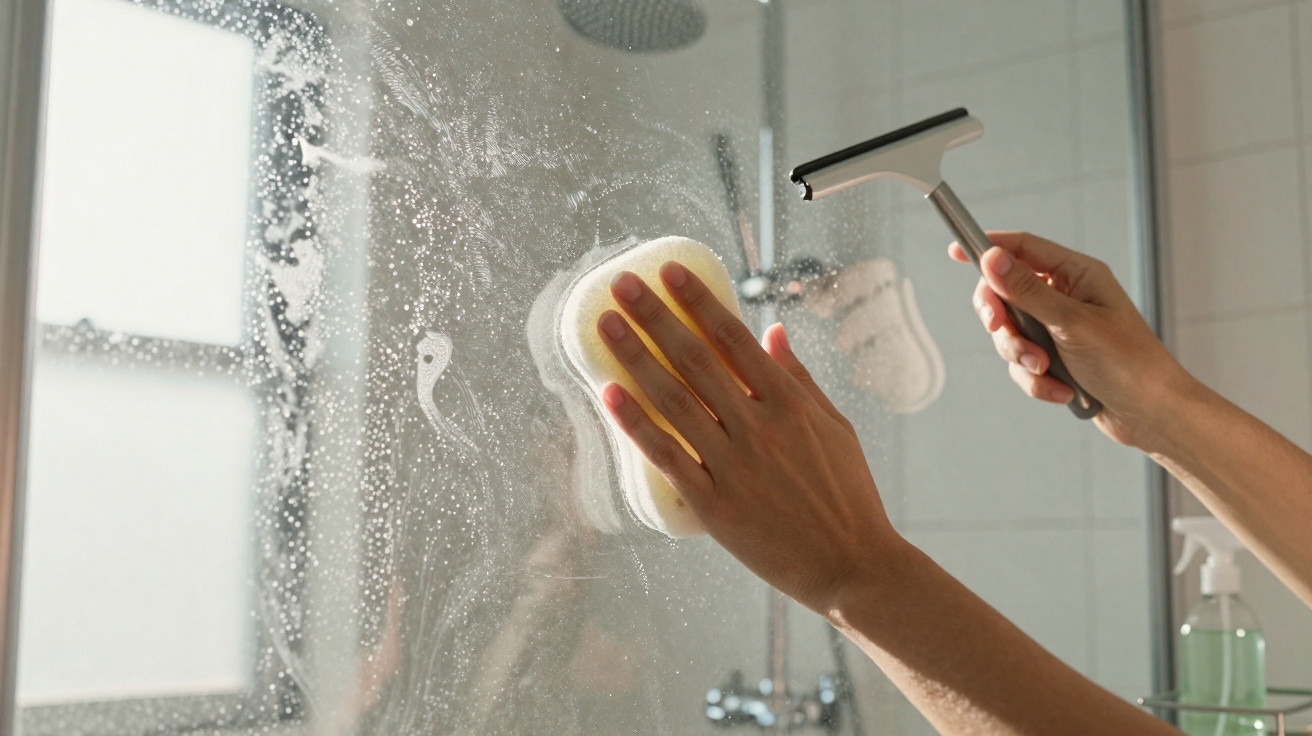
A straightforward professional technique makes exactly this difference.
When you step back into your own bathroom after a hotel break, you notice it straight away: the shower screen is clean, but not genuinely clear. Limescale lines, soap residue, dull patches - even after using pricey cleaning products. In professional housekeeping, hotel chains have long since stopped relying on colourful sprays and instead use a surprisingly simple tool that can make glass look almost newly fitted in just a few minutes.
Why hotel shower screens always look like new
Strict quality standards in housekeeping
In hotels, the bathroom’s first impression can make or break reviews and repeat bookings. A shower screen marked with white spots is taken as a sign of carelessness - regardless of how spotless the rest of the room may be. That is why housekeeping teams work towards two targets: flawless appearance, achieved in very little time.
Every cleaning round is tightly scheduled. There is no room to leave harsh cleaners to soak for ages or to trial several products one after another. Anything that does not work quickly and consistently is removed from the trolley. That is precisely why many properties choose not to escalate the chemicals, but to use a different kind of “weapon” against that pale haze.
The real enemy: limescale and “shower grime” together
The cloudy coating on a shower screen is caused by two elements that amplify each other.
- Limescale: comes from hard tap water, remains once droplets evaporate, and forms a rough, white layer.
- Soap residue: a mix of shower gel, soap, fats and skin oils that settles as a greasy film.
Combined, they create a stubborn build-up. Acid-based products (for example those using vinegar) can break down limescale, but they do not fully tackle the greasy portion. Degreasers remove soap film, yet barely touch the mineral layer. If you only spray and wipe, you are usually dealing with only half the problem.
“The hotel solution doesn’t rely on more chemicals, but on targeted, ultra-fine friction right on the surface.”
The secret tool: an unassuming specialist sponge
What’s behind the “magic” cleaning aid
In many hotels, the go-to option is a small white sponge made from melamine resin, commonly sold as a “magic sponge” or “magic eraser”. At first glance it looks like an ordinary cleaning sponge. The difference only becomes obvious when it is wet and glides over glass or tiles.
Inside, the sponge is made up of tiny, hard structures. Under a microscope it resembles extremely fine sandpaper enlarged many times over. Professionals describe this as micro-fine abrasion: on a microscopic level, the sponge gently abrades the surface without visibly scratching it. That is what allows it to lift both limescale residue and greasy soap film.
Cleaning with elbow grease instead of chemicals
Its performance does not come from a special cleaning liquid - it is purely mechanical. The sponge acts like millions of tiny scrapers that “grab” onto deposits and detach them. Water simply helps it glide and carries away the rubbed-off dirt. For the basic build-up, extra cleaners are not essential.
That suits hotel requirements perfectly:
- Fast: even older hazing can disappear within minutes.
- Reliable: stubborn marks can be removed where ordinary cloths fail.
- Versatile: suitable for glass, ceramics, grout and - with care - chrome fittings.
- Cost-saving: one sponge is inexpensive and can replace several specialist cleaners.
How to use the hotel trick properly at home
Step 1: Moisten the sponge correctly
Never use the specialist sponge dry. Hold it briefly under the tap, squeeze it through a few times, and only lightly wring it out. It should be clearly damp but not dripping. This helps it glide and reduces wear.
Step 2: Work with minimal pressure
This is the key point many people get wrong: do not scrub with full force. The fine structure does most of the work on its own. Place the sponge on the surface, apply gentle pressure, and move in small circles.
Start with the areas that usually suffer the most:
- the lower part of the glass, where water sits for longest
- the area around the shower head and taps
- edges and corners where water tends to pool
As soon as the sponge turns grey or starts to crumble, squeeze it out briefly under running water. Continue with a cleaner side until the whole surface looks evenly damp and slightly matt.
Step 3: Rinse thoroughly and squeegee dry
Afterwards, the loosened residue sits on the glass as a fine film. Rinse the shower screen generously with clean water. Then use the standard professional move many hotels rely on: a rubber squeegee.
“With a simple rubber squeegee, professionals pull the remaining moisture down from top to bottom in strips - preventing fresh water spots.”
Finally, take a dry microfibre cloth and quickly wipe along edges, seals and fittings. That last pass is what delivers the familiar “hotel shine”.
Where to buy the sponges - and what to look out for
Where to buy and what they cost
Melamine sponges are widely available. You can find them:
- in supermarkets in the household cleaning aisle,
- in chemists,
- in DIY stores near cleaning or decorating supplies,
- online, often in larger multipacks.
In multipacks, the cost is often only a few pence per sponge. For a normally dirty shower screen, one sponge is usually enough; for heavily scaled showers, you may need two.
Possible risks and limitations
Because the sponge works abrasively, some surfaces need careful handling. Delicate coatings - such as anti-fingerprint finishes or certain protective sealants - may be damaged. When in doubt, always test on an inconspicuous spot first.
On high-gloss taps, use a very light touch and avoid prolonged rubbing, as micro-scratches can occur. Acrylic baths and softer plastics are also more sensitive than glass or ceramic.
Clear shower screens for longer: how to stop the haze returning
A daily 30-second squeegee routine
The simplest defence against new limescale is immediate: pull water off the glass straight after showering. A budget rubber squeegee is enough. One pass from top to bottom, strip by strip, dramatically reduces leftover water. Less water automatically means far fewer limescale deposits.
Vinegar water as light extra protection
If you want to go a step further, keep a spray bottle in the bathroom filled half with water and half with clear vinegar. After squeegeeing, a quick mist over the glass is enough. Let it run off briefly or spread it with a microfibre cloth. This makes it harder for limescale to take hold.
Dry air instead of constant damp
The room conditions matter too. If the bathroom air stays humid, glass takes much longer to dry. Ideally:
- open the window wide after showering, if you have one,
- let the extractor fan run on for at least 15 minutes,
- leave the shower door or curtain open so air can circulate.
This lowers the risk of mould in grout and silicone, and keeps the glass clearer overall.
How often the hotel trick is worth doing - and what it replaces
Once you have given the shower screen a thorough clean with the specialist sponge, you do not need to repeat it every day. In many homes, using it every few weeks is enough, especially when paired with the quick post-shower squeegee routine. The main benefit is that many aggressive bathroom cleaners can stay in the cupboard - or be used far more sparingly.
In older bathrooms with heavy limescale, it can be worth doing a more intensive first session with the sponge, possibly in two passes. After that, the surface becomes so smooth that limescale and soap struggle to cling on. With a little vinegar water and good ventilation, you can go surprisingly far without reaching for harsh chemicals.
If you keep up this routine, you will soon get that familiar hotel moment at home too: open the door, switch on the light - and the glass looks as though it has just been installed.

Comments
No comments yet. Be the first to comment!
Leave a Comment