
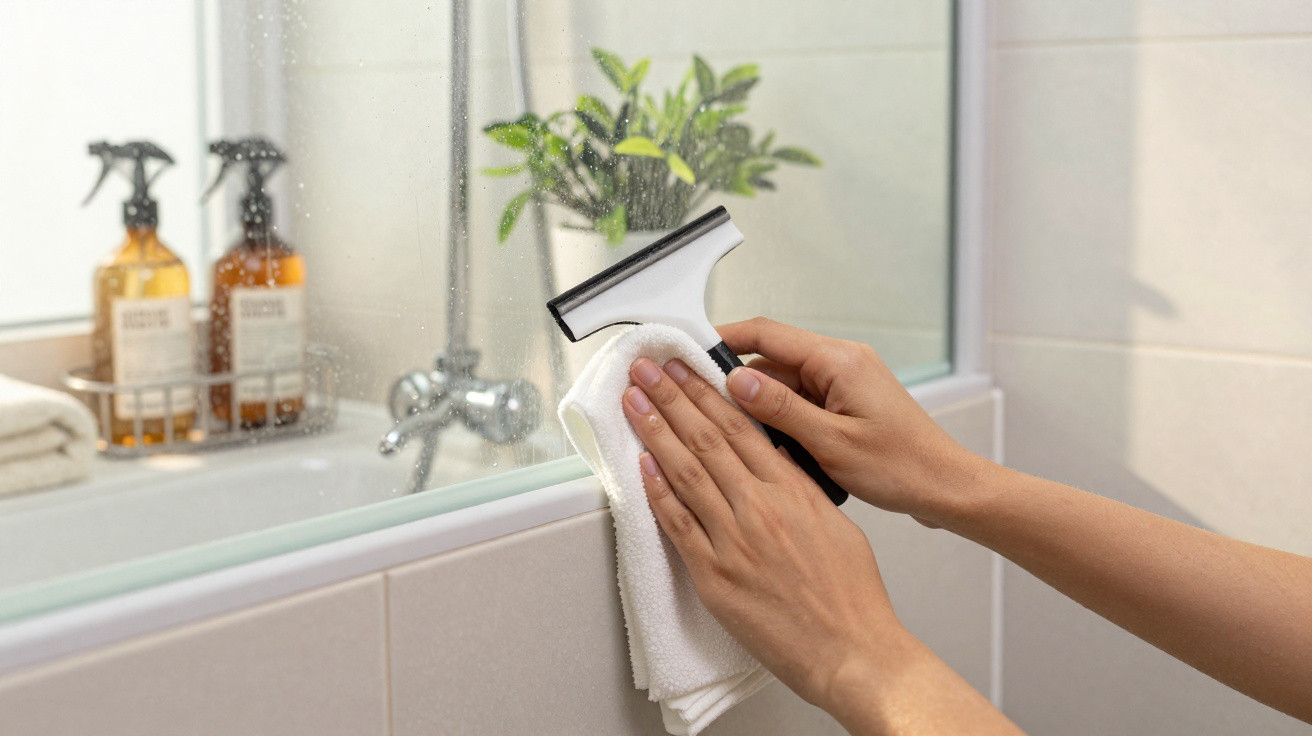
If you finish a shower, turn off the tap and simply reach for your towel, you usually leave one crucial area behind: the damp silicone sealant joints around the shower, bath and basin. Specialists warn that skipping this tiny daily step can lead to mould, stale odours and, over time, even damage to the fabric of the building.
Overlooked hotspot: why silicone sealant joints are so vulnerable
Silicone sealant joints don’t look like a problem. They seal edges, stop water slipping behind tiles or into the rim of a bath, and they seem low-maintenance at first glance. Yet this is exactly where trouble starts: very few places in a bathroom hold on to water as stubbornly as these narrow grooves.
When moisture sits there for hours every day, conditions become ideal for microorganisms. Fungi, bacteria and mould spores thrive in damp, slightly porous silicone. On top of that, limescale and soap residue build up and can stain joints yellowish or grey.
"Regularly damp silicone sealant joints are considered one of the most common triggers for mould problems in bathrooms – often even before poorly insulated walls."
Ignore it and you tend to notice the impact first with your eyes: dark dots, patches and joints that look dull rather than bright white. Later, a heavy, musty smell can follow, and in some cases health issues too-particularly for people with allergies or respiratory conditions.
The straightforward routine experts swear by
The good news is that preventing all of this takes far less effort than most people expect. Plumbing and hygiene professionals recommend a simple everyday routine that becomes second nature after only a few days.
Step 1: Squeegee water away after every shower
Immediately after showering or bathing, use a basic tool: a rubber squeegee like the kind used on shower screens. With it, you can pull water down from tiles, glass-and, most importantly, from the silicone sealant joints.
- Pull water downwards from tiled walls and glass surfaces
- Run the squeegee along the silicone edges around the shower tray, bath and washbasin
- Don’t forget horizontal joints along ledges or rims
This alone removes a large share of moisture before it can linger in joints and tiny gaps.
Step 2: Dry off with a cloth
If you want to be extra thorough, follow up with a small microfibre cloth or an old cotton towel and quickly wipe the joints dry. One or two quick passes around the shower tray is usually enough.
The payoff is much bigger than the effort suggests: the time the joints stay wet is cut by many hours. Microorganisms no longer get the consistently damp environment they need to multiply undisturbed.
What happens if the joints stay wet all the time?
When you miss this step regularly, you won’t necessarily see consequences straight away-and that’s what makes it so deceptive. The changes build up gradually.
| Consequence | What actually happens |
|---|---|
| Discolouration | Joints turn yellowish, grey or blotchy, and the bathroom overall can look “worn”. |
| Mould | Dark dots and streaks appear, often starting in corners and along horizontal joints. |
| Smell | A sweet, musty odour can develop and may be hard to shift even with ventilation. |
| Health | Irritated airways and worse symptoms in asthma or allergies are possible. |
| Structural damage | As silicone becomes porous it seals less effectively, and moisture can seep into walls or beneath tiles. |
Children, older people and anyone with chronic respiratory illness tend to be especially sensitive. For those households, professionals strongly recommend consistent moisture control in the bathroom.
Small habit, big impact
Spending just a few seconds a day on joint care can save a great deal of time, money and frustration later. Tradespeople repeatedly report bathrooms where silicone sealant joints need replacing entirely after only a few years-often because moisture was left sitting there for long periods.
"Drying regularly is far cheaper than new silicone sealant joints and harsh chemical cleaners – and it’s gentler on the airways too."
If you dry the joints consistently, you’re less likely to rely on aggressive mould removers. Mild cleaners and the occasional deeper clean are usually enough to keep the bathroom looking fresh.
How to make the routine stick day to day
To stop the new step fading after a week, it helps to set up a simple plan:
- Keep the squeegee in sight, hung inside the shower or on the wall
- Set aside a small towel specifically for drying the joints
- Briefly show other household members what to do and get them involved
- Link the habit to something you already do consistently, such as brushing your teeth after showering
This is particularly worthwhile in shared households: the more showers there are, the more the joints benefit from daily care.
How often should you do a proper clean?
The daily mini-step doesn’t replace an occasional deep clean, but it does make it far less intensive. Specialists suggest the following rhythm:
- Squeegee water away daily and dry the joints if possible.
- Every one to two weeks, wipe the joints with a mild bathroom cleaner or a vinegar-based cleaner.
- Once or twice a year, do a visual check: are there cracks, lifting edges or deep staining?
As soon as the silicone becomes cracked or starts peeling away from the wall, drying alone won’t solve it. At that point, a professional or an experienced DIYer should renew the joints so moisture cannot penetrate the building fabric.
Mould, allergies, asthma: what’s behind the risks
Mould spores exist everywhere in the air. It becomes a problem when they collect in large quantities in one spot-such as in permanently damp joints. Showering or cleaning can stir the spores up, making it easier to breathe them in.
Many people notice only mild signs at first, such as a slightly scratchy throat or occasional sneezing. Those who already live with allergies, asthma or chronic bronchitis often react more strongly. Recurring infections or headaches can also be linked to a home that is persistently affected by mould.
Because mould in joints is easy to miss early on, some experts now see a daily look at these areas as a kind of “early warning system”: if you wipe the joints dry each day, you’ll spot small changes much sooner.
Additional steps for a consistently healthy bathroom
Joint care is a key part of the solution, but a few extra habits help complete the hygiene picture:
- After showering, air the room for at least five to ten minutes with a burst of fresh air
- Leave the bathroom door open so damp air can escape faster
- Hang wet towels and bath mats to dry in another room if possible
- In winter, don’t turn the bathroom radiator off completely-warmth helps moisture evaporate
In small internal bathrooms without a window, an extractor fan or automated ventilation helps move moisture out. If you also dry the joints daily in those spaces, you significantly reduce the risk of mould.
Why this tiny step makes such a difference
Many people assume the big weekend clean is what keeps a bathroom hygienic. Hygiene specialists tend to see it differently: small, consistent actions prevent problems from taking hold in the first place.
That’s the core of the advice. Those few seconds spent drying silicone sealant joints tackle the root cause-lingering dampness. Reduce that moisture reliably, and you protect appearance, health and the building fabric at the same time. It’s a minimal effort with a major effect, and it can be done in almost any home without special equipment.



Comments
No comments yet. Be the first to comment!
Leave a Comment