
A simple, little-known method takes care of the problem almost by itself.
Plenty of people regularly clean the baking trays and the oven door glass, yet the oven racks get ignored. That is exactly where most of the burnt-on, greasy residue builds up - and it can be a nightmare to shift in the kitchen sink. One straightforward household trick, with the bath as an unexpected helper, turns this hated chore into a surprisingly low-effort job.
Why oven racks stay so stubbornly dirty
When it comes to cleaning the kitchen, oven racks rarely sit at the top of the list. They are awkward, full of corners and edges, and usually only fit halfway into the sink. Anyone who has tried it knows what happens next: water sloshes everywhere, only part of the rack is submerged, and the rest stays caked on. In the end, it often gets a quick wipe and nothing more.
Many people then reach for harsh oven cleaners. They do break down the grime, but they can irritate eyes and airways, may attack the metal surface with frequent use, and add to wastewater pollution. That is before you even factor in the waiting time, the smell, and all the scrubbing.
"Most people struggle with their oven racks - not because they are lazy, but because they have never learnt a truly practical method."
There is also a psychological quirk at play: the racks can look “fine” as long as the glass door is spotless. In reality, those bars are in direct contact with food, fat and marinades. Cleaning them routinely is more hygienic - and helps stop the whole oven developing a stale, old-grease smell sooner than it should.
The surprising solution: the bath as a cleaning station
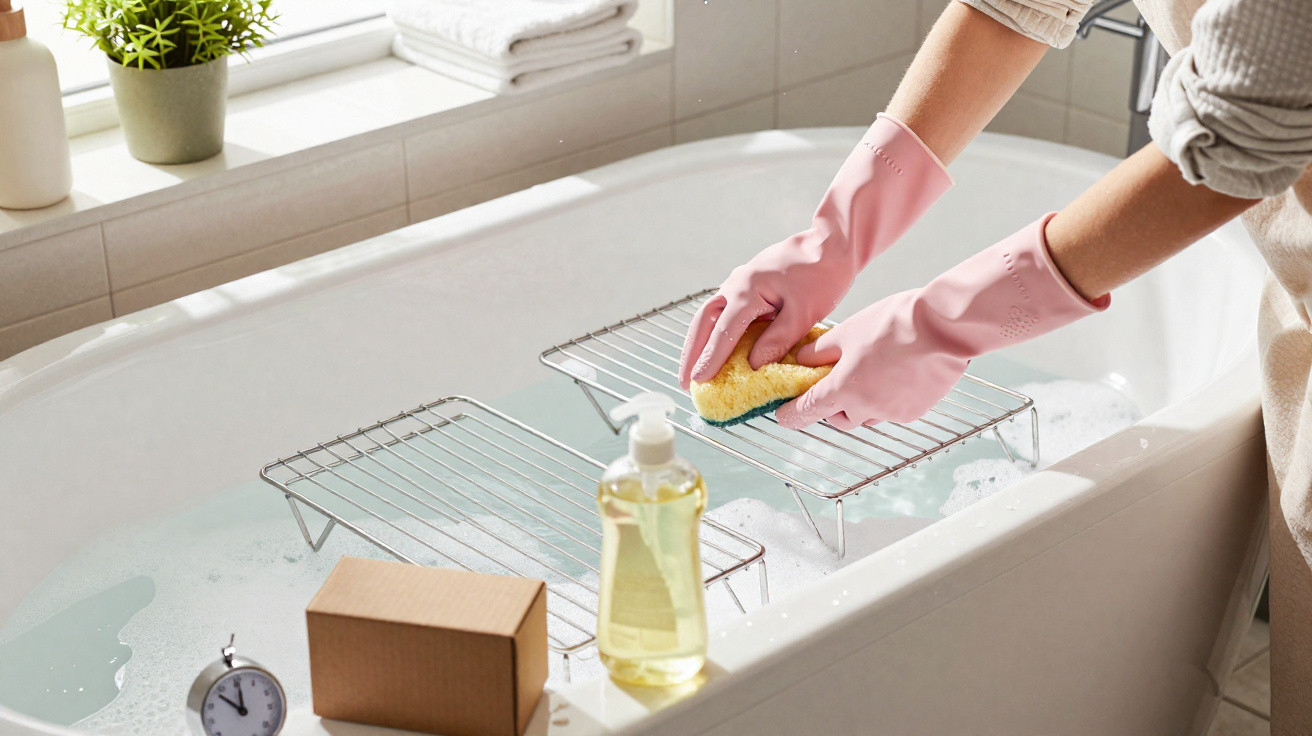
The real game-changer is a place most people never consider when cleaning the kitchen: the bath. It is large enough for the racks to lie fully under water - no half-submerged rack and no bowl taking up space on the worktop.
To protect the bath enamel, one simple step is worth doing: lay an old, thick towel or a fabric blanket on the bottom of the bath. This prevents scratches and also muffles the noise when you place the metal racks in, or turn them over.
- Enough space for the whole rack
- No splashing over like in the sink
- A more comfortable working height, less bending
- Grime stays contained in one place rather than spreading around the kitchen
If you do not have a bath, you can use a large laundry tub or a long plastic storage box instead, and place it in the shower. The key point is that the racks must be completely submerged.
Which household items you need - and why they work so well
You only need three basics that many homes already have:
- very hot water
- bicarbonate of soda (or a classic baking powder that is high in bicarbonate)
- grease-cutting washing-up liquid
Hot water softens baked-on residue, and full immersion means every part is reached. Bicarbonate of soda works as a mild, non-abrasive cleaner: it loosens layers of grease and protein without roughening the surface. Washing-up liquid breaks down fat structures so the oily film can lift into the water.
These approximate quantities work well:
| Ingredient | Amount per average-filled bath |
|---|---|
| Bicarbonate of soda | approx. 150 g |
| Washing-up liquid | approx. 50 ml |
You do not need to measure to the gram. What matters more is water that is noticeably hot, plus enough washing-up liquid to create a light foam.
Step by step: how to do the clean
1. Preparation in the kitchen and bathroom
Start by switching the oven off and letting it cool fully. Remove all racks and, if your oven has them, any removable side rails. Knock off loose crumbs briefly or wipe them away with kitchen roll, then take everything to the bathroom.
Spread a thick towel in the bath. Place the racks side by side on top, ideally without stacking them, so the water can reach every surface later.
2. Fill the bath and mix the solution
Put the plug in, then run very hot water until the racks are completely covered. Next, sprinkle the bicarbonate of soda evenly across the surface and wait a moment for it to dissolve.
After that, add the washing-up liquid and gently distribute it using the shower head or your hand. You do not need a mountain of bubbles - a thin layer is enough.
"The combination of heat, bicarbonate of soda and washing-up liquid loosens the grime so that only a few wipes are needed afterwards."
3. Soaking time - let the water do the work
This method relies on patience, not brute force. Leave the racks in the bath for at least 30 minutes. If you are dealing with heavily burnt-on patches, you can soak them for several hours or overnight.
During this time, a large portion of the crusted residue will loosen on its own. It is common to see small slicks of fat and dark particles floating to the surface - a good sign that the mixture is working.
4. Light follow-up cleaning and a thorough rinse
Once the soaking time is up, lift the racks out one at a time and wipe them down with a sponge or a soft brush. In many cases, lightly stroking along the bars is enough to remove the remaining residue. Avoid coarse steel wool, as it can permanently scratch the surface.
Then rinse the racks under clean water until there is no slippery soap feel left. If you like, finish with a quick cold rinse from the shower head - it helps reduce water marks.
5. Dry and store properly
A large bath towel or a clothes airer works well for drying. Make sure the racks are completely dry before putting them back in the oven to prevent flash rust and water spots.
If you want to make the most of the moment, you can clean the oven door and interior walls at the same time. That way you end up with a clean cooking space that also smells fresher in one go.
Less chemistry, more comfort: why this method is worth it
The biggest benefit is how much less effort it takes. Soaking lifts the grime so you do not have to scrub for minutes on end. It is kinder on both the finish and your patience.
There is also a health angle: in normal doses, bicarbonate of soda and washing-up liquid are far less problematic than many specialist cleaners that create irritating fumes. In homes with children or pets, that is a real advantage.
- Gentler on metal surfaces
- Less smell during cleaning
- Lower strain on skin and airways
- No need for expensive specialist products
If you plan this kind of bath soak regularly after heavy roasting or baking, you stop thick, almost glassy layers from building up. Light dirt comes off faster, and the oven stays noticeably better maintained over time.
How often should you really clean oven racks?
There is no single rule, but a few guidelines make it easier to judge. If you cook pizza, casseroles, roasted vegetables or meat in the oven several times a week, aim to deep-clean the racks roughly every four to six weeks.
If your oven is only used occasionally, a bigger cleaning session once per quarter is usually enough. It makes sense to act at the latest when:
- brownish-black edges become visible
- the oven smells faintly stale and greasy even after airing
- dried marinade residue is stuck to the bars
If you soak the racks soon after particularly “greasy” meals - for example a goose, a very cheesy lasagne, or marinated steaks - you will save yourself a much bigger job later.
Practical tips, risks and useful add-ons
With older racks or ones that seem delicate, it is worth checking the cooker manufacturer’s manual. Some specialist coatings do not react well to aggressive abrasives - although those should not be used here anyway. With normal handling, bicarbonate of soda and washing-up liquid are generally considered low-risk.
If you live in a hard-water area, you may notice pale marks after drying. A quick wipe over the dry racks with a tiny amount of cooking oil on a cloth helps, and it also leaves a light protective film.
You can also fold in another kitchen trick at the same time: baking trays can go into the bath as well, as long as there is room. Burnt-on cheese edges and greasy rims loosen in the same solution. Just treat non-stick trays gently and avoid stiff brushes so you do not damage the coating.
For anyone short on time or without the strength for heavy scrubbing, this approach can feel like a real release. The work shifts away from scouring and towards organising: run the water, add the household items, wait, wipe briefly - done.
Once you have used this technique a few times, it quickly becomes part of the normal household rhythm: after a bigger weekend of cooking, the racks “go in the bath” while you tidy the kitchen. That way, the oven stays clean long-term without turning into a major project every time.
Comments
No comments yet. Be the first to comment!
Leave a Comment