
Many people diligently wipe the oven door glass and scrub the baking trays, but what about the oven racks themselves? They’re surprisingly often ignored. Yet it’s the racks that tend to collect the thickest layers of grease and baked-on residue - the kind that feels impossible to shift by hand. A smart household trick shows how you can tackle the job with a few everyday items and an unexpected location, with far less effort than you’d think.
Why oven racks get so stubbornly dirty
In day-to-day cleaning, oven racks rarely make it onto the list. They’re bulky, full of bars and corners, and they don’t fit neatly into a sink or an ordinary bucket. Anyone who has tried knows the usual outcome: water splashes everywhere - just not where you need it - and the rack ends up half in the sink and half out.
On top of that, baked-on marinades, melted cheese and spilled fat get effectively welded onto the metal at high temperatures. Many people then reach straight for harsh oven cleaners. They can shift some grime, but they can also:
- irritate eyes and airways,
- attack the protective layer on the metal,
- leave unpleasant odours lingering in the oven.
The result is predictable: the job gets put off again and again until the rack looks truly unappetising and even cooking starts to feel less appealing.
The unexpected place: why the bath becomes the cleaning station
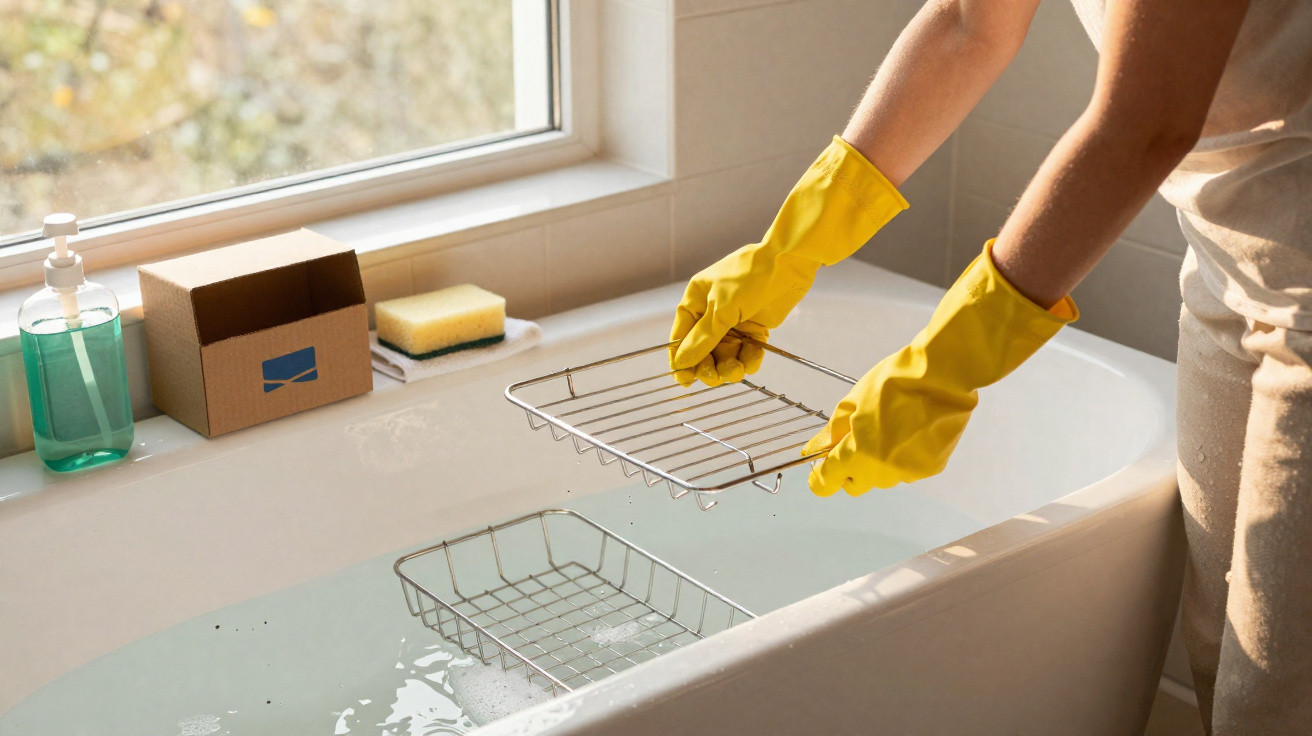
The real issue is space. A standard oven rack is too big for a sink or washing-up bowl - but not for a bathtub. In the bath, you can lay it completely flat and cover it fully with water. That full immersion is exactly what’s needed for stubborn, baked-on layers to loosen evenly.
To avoid damaging the bath enamel, a simple protection trick helps:
- place a thick old towel on the bottom of the bath,
- set the rack(s) on top so metal isn’t scraping directly against the tub,
- prevent scratches and reduce noisy clattering.
“The bathtub provides the space an oven rack will never get in the sink - that’s what makes this method so effective.”
The three ingredients most people already have at home
The core of this approach is a straightforward mixture that doesn’t require specialist products. You only need:
- very hot water,
- bicarbonate of soda (baking soda),
- a standard, grease-cutting washing-up liquid.
Each ingredient plays a specific role:
- Hot water softens hardened residue and helps the grime open up. The hotter the better - ideally, use water straight from the kettle.
- Bicarbonate of soda is mildly alkaline with a gentle abrasive effect. It helps lift greasy residue and brown staining without scratching the surface.
- Washing-up liquid breaks grease into tiny droplets so it releases from the metal bars and disperses into the water.
A useful rule of thumb for quantities is:
| Ingredient | Amount per bathtub* |
|---|---|
| Bicarbonate of soda | approx. 150 g |
| Washing-up liquid | approx. 50 ml |
| Hot water | enough to fully cover the racks |
*Figures are based on a typical household bathtub with 1–2 oven racks.
Step by step: how to clean the racks
1. Position the rack in the bath
Lay the old towel in the empty bath, then place the oven rack(s) on top. They can overlap slightly, but aim to keep them positioned so water can flow around as much of the surface as possible.
2. Fill with hot water
Run very hot water until the metal grid is completely submerged. If you want to boost the temperature, carefully add additional boiling water from the kettle.
3. Mix in bicarbonate of soda and washing-up liquid
Sprinkle the bicarbonate of soda generously over the water and directly onto the racks. Then add the washing-up liquid to the bath. Briefly stir with your hand or an old brush so it disperses - you don’t need perfect foam; a rough mix is enough.
“It’s the heat, bicarbonate of soda and washing-up liquid that loosen the grime - not brute force.”
4. Leave it to soak - ideally undisturbed
Leave everything untouched for at least 30 minutes. During this time the dirt starts to lift, and some of it will already show up as a brown film in the water. For heavily baked-on racks, patience pays off: leaving them for several hours or overnight usually produces the most noticeable change.
5. Light touch-up, rinse, dry
After soaking, a soft sponge or soft brush is often enough to remove remaining edges and crusted patches. Hard scrubbing is rarely required; much of the residue will slide off.
Then drain the bath, rinse the racks thoroughly with clean water, and dry them with a tea towel. If you let them air-dry, wipe off any water marks with a cloth before they settle.
Why this method is gentle on materials
Compared with many chemical oven cleaners, a bicarbonate-and-washing-up-liquid solution is far less likely to damage the metal’s protective layer. Because heavy abrasion isn’t necessary, the rack’s finish and coating are more likely to stay intact. That can extend the life of the accessory and reduce the risk of rust spots.
At the same time, you avoid strongly smelling fumes and aggressive ingredients - a clear advantage for households with children, pets or sensitive airways.
How often should you clean oven racks like this?
How frequently you need to do it depends on how you use the oven. If you regularly cook bakes, pizza or greasy foods, it’s sensible to deep-clean the rack around every four to six weeks. As a practical guide:
- Frequent roasting and baking: every 4 weeks
- Occasional use: every 2–3 months
- After a major spill-over: soak soon after everything has cooled
If you wipe away large bits straight after baking with a damp cloth, you can usually extend the gap between these “bathtub sessions” considerably.
More tips for a clean oven without harsh chemicals
Clean baking trays at the same time
Baking trays can be cleaned using the same mixture in the bath - or, if they fit well, in the sink. For stubborn baked-on spots, sprinkle on a little dry bicarbonate of soda first and dampen it briefly to boost the effect.
Prevention saves effort
A few habits help stop racks becoming heavily crusted in the first place:
- For dishes that drip a lot, slide a tray underneath the rack.
- After cooking, while the oven is still warm (not hot), wipe splashes with a damp cloth.
- Avoid spraying strongly caustic products onto bare metal, as they can attack the surface.
What’s happening chemically with bicarbonate of soda and degreaser
Bicarbonate of soda is mildly alkaline. Grease and baked-on food residues respond by loosening from their hardened structure more easily. Combined with heat, part of the fatty layer softens and becomes more fluid. The washing-up liquid then binds to those softened fats and breaks them into tiny droplets that disperse in the water.
That combination is the key: hot water alone is usually too weak, and washing-up liquid on its own is often too slow. Add bicarbonate of soda, and the bathwater becomes a kind of mild cleaning soak that can penetrate deeply into the grime.
Risks, common mistakes and how to avoid them
Even though the method is straightforward, a few points are worth bearing in mind:
- Don’t use steel wool: it can scratch the rack’s protective layer and encourage rust.
- Don’t pour boiling-hot water into thin plastic tubs: if you’re using a portable baby bath or similar, watch the temperature.
- Rinse racks completely: leftover washing-up liquid can smell when heated next time, or end up on food.
- Clean the bath afterwards: grease residue lifts easily with a bit of washing-up liquid and hot water, so the surface doesn’t stay slippery.
With these basics in mind, oven racks become far less daunting. What used to feel like a dreaded scrubbing marathon turns into a manageable routine: soak, lightly brush, rinse, done - and the kitchen immediately feels fresher.

Comments
No comments yet. Be the first to comment!
Leave a Comment