
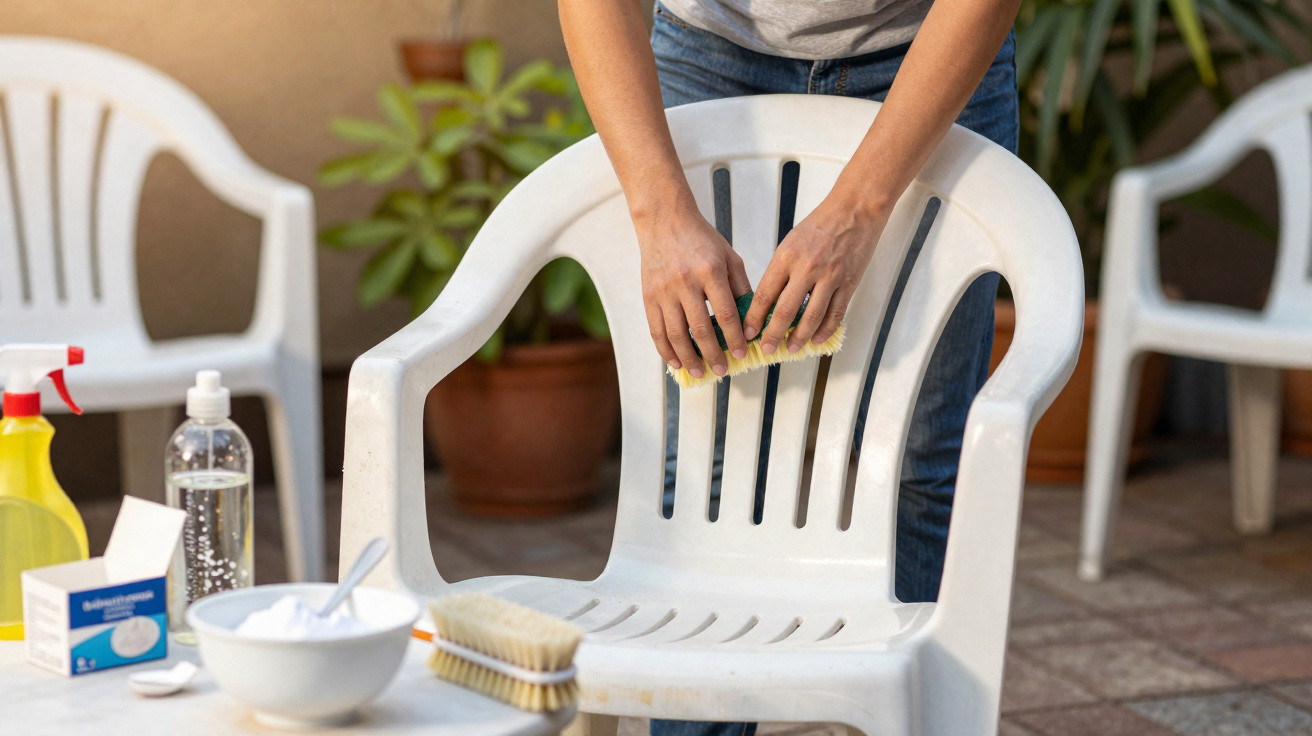
As soon as spring arrives, many people bring their outdoor seating back into use - only to notice the problem: plastic that was once bright white or vividly coloured now looks dull, grey and sometimes yellowed. Before you throw everything out in frustration, it’s worth taking a closer look. With a simple blend of everyday kitchen ingredients, older pieces can often be made to look surprisingly good again.
Why plastic garden furniture turns yellow and grey so quickly
Plastic is often sold as low-maintenance, yet real life can feel like the opposite: after just one or two summers, chairs and tables can look tired and aged. That’s usually down to the combination of sunlight, moisture and everyday grime.
UV rays from the sun gradually attack the surface of the plastic. Over time the material becomes more brittle and slightly porous, which means dust lodges more easily in tiny imperfections. Add rain, pollen, traffic pollution and bird droppings, and you end up with a greasy grey film that’s hard to ignore.
White PVC is particularly prone to this. Any small change in colour shows immediately, and the material often develops a faint yellow tinge over time. Coloured furniture, on the other hand, tends to lose its brightness slowly and can look faded if it wasn’t manufactured with UV protection from the start.
Other outdoor materials age too - just in different ways:
- Metal: can rust without corrosion protection
- Wood: turns grey and needs oiling and occasional sanding
- Woven materials such as rattan: don’t cope well with constant damp and strong, direct sun
Even so, plastic furniture has one clear advantage: as long as nothing is broken or deeply cracked, it can often be improved dramatically in appearance.
“Many greyed plastic chairs look ready for bulky waste - but a targeted clean and care routine often brings them back surprisingly well.”
The two-step plan: deep clean first, then the miracle mix
Before you reach for any special blends, you need a thorough initial clean. If you do this part properly, you’ll save yourself a lot of scrubbing later.
Step 1: remove loose dirt
Start by getting rid of anything that isn’t stuck on: cobwebs, leaves and dust. A soft brush or a small hand brush works well. The key point is to avoid stiff, harsh brushes, as they can scratch the surface - and those scratches will only trap more dirt in future.
Next, use warm water with a little washing-up liquid in a bucket; that’s all you need. With a soft cloth or sponge, work over the furniture to loosen the first layers of grime, grease and pollen. It can take a bit of time, but it makes a big difference to how well the next mixture performs.
Step 2: the household mix for extra shine
Once the worst dirt has gone, it’s time for the tried-and-tested homemade blend. You only need items most households already have.
| Ingredient | Amount | Purpose |
|---|---|---|
| Warm water | approx. 500 ml | base liquid, loosens dirt |
| Household vinegar (clear) | 1 tablespoon | tackles limescale, lightly degreases |
| Bicarbonate of soda, or baking powder based on bicarbonate of soda | 2 tablespoons | gentle abrasive action, neutralises odours |
| Washing-up liquid | a small squirt | cuts grease, helps the mix spread evenly |
Put the ingredients into a spray bottle and top up with warm water. Shake briefly, then spray the furniture surfaces generously. Work it in with a soft sponge or cloth, rubbing in the direction of the surface texture so the film lifts more effectively.
Leave it to sit for a few minutes, but don’t let it dry on. Then rinse thoroughly with clean water so no residue remains. If you have a garden hose, this part is quick and easy.
“The combination of vinegar, bicarbonate of soda and washing-up liquid works against limescale, grease and the grey film - exactly what yellowed plastic needs.”
Stubborn marks: what helps on white and on colour
Some stains sit deeper - for example dark rings from plant pots, bird droppings, or old discolouration caused by sun cream. In those cases, the simple spray won’t always be enough.
For heavily soiled white furniture, a cleaning stone (often sold as a ‘cleaning paste stone’) can work well. It’s made from fine minerals plus a little soap and glycerine. Dampen a sponge slightly, pick up a small amount of paste, rub gently over the affected area, and then rinse very well.
With coloured furniture, it’s best to test first on an inconspicuous corner. Some products can slightly alter the shade or make the finish look duller. If the test area looks fine, you can continue carefully.
When it’s better to replace rather than restore
Before any major clean, a quick safety check is sensible. If you can see cracks in the seat or in any load-bearing parts, it’s a real risk: plastic can suddenly snap under weight. In that situation, the item shouldn’t go back on the patio - it needs disposing of.
If the issue is purely cosmetic, a bit of surface work is often enough. Small scratches or badly weathered areas can be lightly sanded with fine sandpaper (around 120 grit). After that, a specialist paint designed for plastic can be sprayed on or brushed on. Done well, old chairs can look almost new again - and matching seating sets in particular look far more uniform and tidy.
How to prevent yellowing in the future
If you’d rather not restore your garden furniture every year, prevention is the smarter approach. Even when buying, it pays to look for quality and for clear labelling. Models with stated UV protection or through-coloured material tend to keep their appearance for much longer.
Storage matters just as much. Ideally, keep furniture somewhere dry and sheltered through autumn and winter - a cellar, garage or shed is perfect. If that isn’t possible, sturdy protective covers help. Leave a little ventilation at the bottom so condensation doesn’t build up.
- Clean at least once per season with warm soapy water
- Never rub surfaces with cooking oil - it can make plastic more porous and attracts dirt
- Avoid constant direct sun where possible, or use a parasol
- Wipe off marks such as bird droppings or sun cream promptly
Many people swear by “secret tips” such as car polish or aggressive cleaners. These may give a quick shine, but they often damage the material. Mild products used regularly are usually better than harsh chemicals used rarely.
Why bicarbonate of soda, vinegar and washing-up liquid work so well together
The blend of bicarbonate of soda, vinegar and washing-up liquid isn’t magic - it’s straightforward household chemistry. Vinegar dissolves limescale residue, such as deposits left by rainwater or tap water. Bicarbonate of soda provides gentle abrasion and can bind odours. Washing-up liquid helps lift grease and residues from creams off the surface.
If you don’t have bicarbonate of soda to hand, baking powder can be used as a backup, as many types are largely bicarbonate of soda. Pure bicarbonate of soda usually gives the best results, though. What matters either way is rinsing thoroughly with clean water so nothing tacky is left behind.
For families with children and for pet owners, there’s another advantage: these ingredients are far less troublesome than strong chlorine cleaners or powerful solvents. Even so, wear gloves if you have sensitive skin, and don’t let leftovers simply run into the garden soil.
Once you’ve seen a plastic chair that looked “finished” come out noticeably lighter and fresher after this treatment, you’ll think twice before sending it for bulky waste on your next spring clean. Sometimes that’s all it takes to get the patio ready for summer without a huge amount of effort.
Comments
No comments yet. Be the first to comment!
Leave a Comment