
What starts as a small irritation can quickly turn a relaxed evening into a mini household emergency. Plenty of people reach straight for the most aggressive drain cleaner they can find and pour it in, without really understanding what’s going on inside the pipework.
Why harsh drain cleaners usually fix nothing for long
In the UK and the US, a blocked bathroom basin tends to follow the same pattern. The water begins to hang around, you notice a slight gurgle, and then a stale, musty odour starts to drift up. By the time the sink is more like a shallow puddle, most households have already tipped at least one bottle of chemical unblocker down the plughole.
Professional plumbers rarely reach for a bottle first. Their favourite fix is almost always 100% mechanical.
The warning signs hiding in your sink
A slow-draining sink nearly always builds up in stages rather than appearing overnight. At first, the water just takes a little longer to clear after a quick wash. Next comes that hollow glug-glug as air struggles past the restriction. In lots of homes, the next step includes:
- stubborn smells that stick around even after you’ve cleaned the bathroom
- water lingering around the plughole every single time the sink is used
- a light brown or grey tide mark forming where the water keeps stalling
Over time, a mix of hair, soap scum and skin oils compacts into a tight plug. Because bathrooms are warm indoors, bacteria multiply inside that build-up - which is why the odour often recalls rotten eggs or a damp changing room.
What chemical unblockers really do to your plumbing
Many well-known drain cleaners are based on powerful alkalis or acids. They react with organic material and generate heat. If the blockage is new and still relatively soft, they may carve out a thin channel through it. The basin starts emptying again, so the product appears “effective”.
From a plumber’s point of view, that’s only half the story. The clog usually isn’t properly removed. Some of it can turn into a tacky sludge that sticks further down the pipe. Then, over the following weeks, fresh hair and soap latch onto that roughened layer and the blockage returns - often more stubborn than before.
Repeated chemical treatments can slowly thin plastic pipes, dry out rubber seals and damage metal finishes around the plug.
In older properties with delicate pipework, taking that shortcut can even lead to leaks. When you also factor in the environmental cost of flushing caustic chemicals into the wastewater system, it becomes clearer why professionals typically prefer hands-on, mechanical methods.
The “secret” method plumbers actually use first
Behind the tiles and chrome, a bathroom sink is still a straightforward setup: a basin, a waste fitting, a curved trap, and a discharge pipe. The part that matters most is tucked underneath, usually behind cupboard doors.
The humble trap: small part, big role
Under most sinks you’ll see a U-shaped, S-shaped or bottle-style section. That’s the trap. It holds a small amount of water to prevent sewer gases from coming back into the room. But because of its shape, it also becomes the obvious place for debris to collect.
| Trap function | What actually happens |
|---|---|
| Block odours | A permanent water seal stops air from the drainage system entering the bathroom. |
| Catch objects | Rings, hair grips and other small items often land here instead of vanishing forever. |
| Trap build-up | Hair, toothpaste, soap and limescale settle in the curve and slowly form a plug. |
When a plumber is called out because a bathroom sink is draining slowly, this is commonly the first component they deal with - not a snake, not a bottle, and not an inspection camera. Just the trap.
Why a manual clean beats a chemical “attack”
Taking off the trap and cleaning it properly by hand achieves something chemical products seldom manage: it brings back the pipe’s original internal width. Water runs as freely as it did on the day the basin was fitted.
Instead of burning through the clog, you physically remove it and leave almost nothing behind for new debris to stick to.
There’s no extra heat putting stress on plastic parts. There are no fumes in a small, steamy bathroom to sting eyes or irritate lungs. And if jewellery has gone missing, you can see exactly where it ended up.
The no-splash method many plumbers quietly rely on
A big reason people avoid doing anything with plumbing is the fear of making a mess. A simple, careful routine removes most of that risk - and it mirrors what experienced tradespeople do on quick domestic jobs.
The bucket move that saves your floor
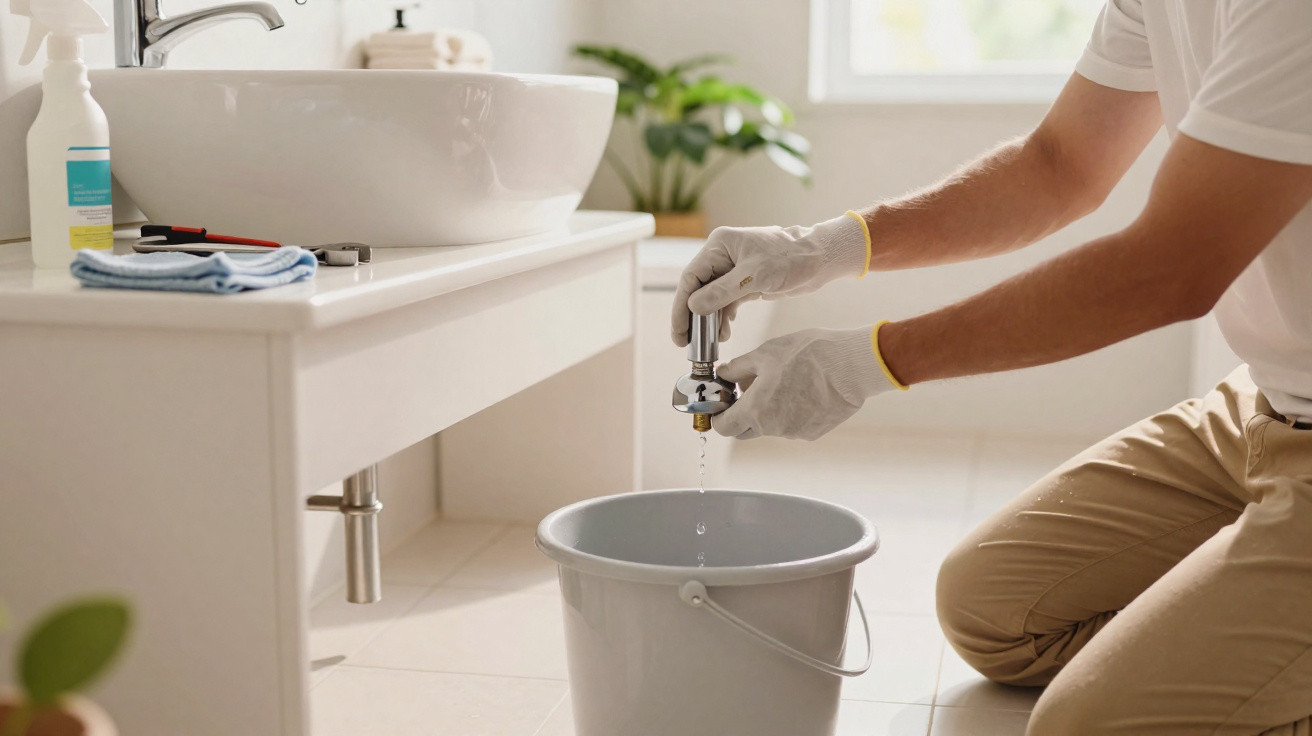
Before you loosen anything, empty the cupboard beneath the sink. Slide a shallow bucket, washing-up bowl or storage tub directly underneath the trap, and keep an old towel close by for the odd drip. That’s your safety net.
On many modern traps, you can undo the fittings by hand. The bottom “cup” or the lower bend typically twists free with a firm grip. If it won’t budge, using a cloth or rubber gloves can help you get purchase. Adjustable pliers may be useful in a pinch, but plumbers usually wrap the jaws with a rag so they don’t scratch plastic or mark chrome.
As soon as the threads start to release, the water held in the trap drops neatly into the container rather than onto your bath mat. That small step is often what keeps the whole task calm and controlled.
The slightly gross but very effective clean-out
With the bottom section removed, the culprit is usually obvious: a dark, tangled lump that smells even worse than it looks. At this stage, plumbers typically do three things:
- remove hair and debris by hand or with a small hook
- scrub the inside of the trap using an old toothbrush or a bottle brush
- flush everything through with very hot tap water, or water from a kettle left to cool for a minute
The goal is not just to dislodge the main plug, but to remove the slimy film that lines the pipe walls.
That coating - known as biofilm - works like an adhesive for fresh particles. Stripping it away makes a quick re-blockage far less likely. Some professionals will also push a small flexible brush or a short length of cable a little way into the waste pipe to break up any early build-up beyond the trap.
Reassembly: the part where leaks start or never happen
Before refitting the trap, it’s worth checking the rubber seals carefully. These o-rings and conical washers create the watertight joins between the sections. If they seem cracked, squashed flat or tacky, swapping them out is inexpensive and can save you from drips later on.
When putting the trap back together, plumbers tend to stick to two basics: make sure the threads are aligned properly and tighten by hand. Cross-threading on soft plastic fittings can cause subtle damage that shows up as a leak later. Once it’s reassembled, run the tap and place your hand around each joint, checking for even the smallest bead of water.
From swampy basin to healthy bathroom habit
People who try this approach once often find their view of small plumbing problems changes. What looked “technical” becomes surprisingly doable - and the improvement is immediate.
A sink that drains like new – and smells neutral again
When the trap is properly clean, the water returns to a natural swirl down the plughole. Instead of sitting in the basin, it drops away in a steady, confident flow. The lingering odour goes too - not because it’s been covered up, but because the bacteria-filled build-up has been removed.
That ten-minute intervention often improves both hygiene and comfort more than another round of scented cleaning sprays.
For households with children or pets, avoiding corrosive chemicals also removes a significant hazard from under the sink. In smaller bathrooms where storage is within easy reach of little hands, that’s a meaningful upgrade.
Simple habits to avoid repeating the job every month
Plumbers who don’t get repeat call-outs for the same basin usually recommend two straightforward habits rather than miracle products:
- fit a drain strainer over the plughole to catch hair and larger debris
- flush the drain weekly with hot water to soften early soap deposits before they set hard
In hard-water areas, limescale makes things worse by leaving a rough surface inside the pipe. A strainer plus regular hot rinses reduces how much scale binds to organic matter, slowing the whole clogging process.
When a DIY clean is enough – and when to call someone
This basic mechanical clean is suitable for most standard bathroom sinks where you can easily reach the trap. It’s particularly effective in modern flats and houses with relatively short pipe runs.
That said, some blockages sit further down the line, or the pipework may run through awkward, inaccessible spaces. If several fixtures are draining slowly at the same time, if the toilet gurgles when the basin empties, or if water backs up into the bath, it may point to a more significant restriction or a ventilation issue. In those cases, professionals will use inspection cameras, longer drain snakes, and - in older properties - their experience of unusual layouts hidden behind walls.
For everyday clogs, though, this simple “bucket, twist, clean, reassemble” routine is often exactly what you’d pay a call-out fee for. Knowing how it works turns a frustrating winter blockage into a small, contained job that leaves the bathroom cleaner, safer and easier to live with.




Comments
No comments yet. Be the first to comment!
Leave a Comment