
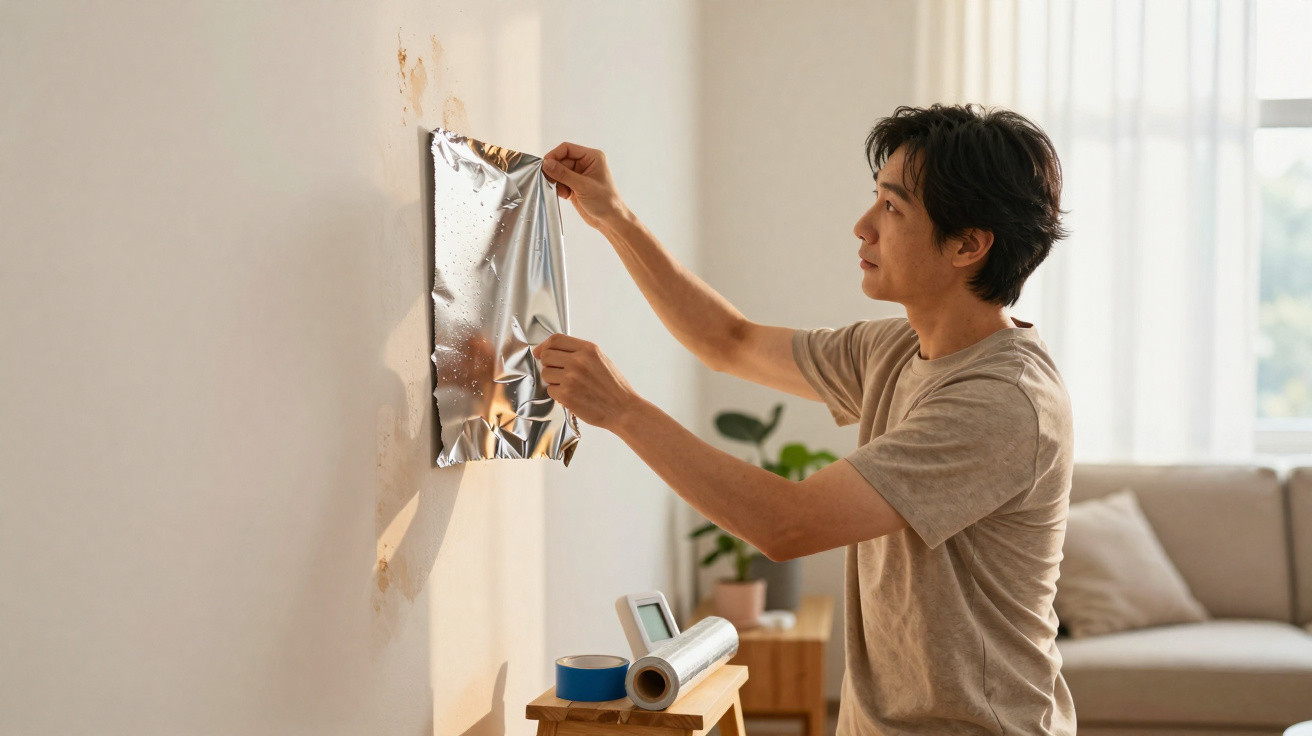
Damp walls are irritating, they smell unpleasant, and they can ruin wallpaper and furniture - and in the worst cases even damage the building fabric. Before you bring in tradespeople and drying equipment, it’s worth trying a surprisingly simple aluminium foil test to work out where the moisture is coming from in the first place: from outside, or from inside the home.
Why aluminium foil on a wall can actually be useful
In many homes, brown tide marks, black specks, or paint that bubbles and splits eventually appear on a wall. In most cases, it comes down to one of two issues:
- Moisture is getting into the wall from outside or from pipework.
- The indoor air is too humid, and water is condensing on cold surfaces.
The problem is that, visually, these two scenarios can look almost identical. If you start renovating blindly, you risk making expensive mistakes. That’s exactly where aluminium foil helps - not as a fix, but as a quick diagnostic tool.
"Aluminium foil doesn’t replace a specialist, but it helps narrow down the cause of moisture - and can save time and money."
The idea is simple: the foil isolates a small patch of wall from the room’s air. That makes it easier to tell whether moisture is pushing out of the wall itself, or whether it’s only coming from the air.
Step by step: how the aluminium foil test works
You only need two things for this test: a piece of aluminium foil and some adhesive tape. Nothing else.
1. Choose a suspicious area
Pick a spot where typical signs of damp are already showing, such as:
- dark or yellowish stains
- flaking paint or paint that has gone wavy
- a musty smell that becomes stronger when you pull a piece of furniture away from the wall
- a cold wall surface that feels slightly clammy
Ideally, choose an area that isn’t right next to a radiator or a window, as that could distort the result.
2. Attach the aluminium foil neatly
The method is straightforward, but accuracy matters:
- Cut a piece of aluminium foil slightly larger than the suspect mark.
- Use the dull side or the shiny side - it doesn’t matter, as long as the foil sits flat.
- Press the foil directly onto the wall.
- Seal all edges completely with tape, with no gaps.
The foil should be as tight as possible, with no creases or tears. Any small opening lets air through and makes the test less reliable.
3. Be patient: wait 24 to 48 hours
This check needs time. Professionals recommend leaving the foil on the wall for at least 24 hours - and ideally up to 48 hours. During this period: leave it alone. Don’t peel it back and don’t “just have a look”.
Depending on the underlying cause, moisture can collect during this time - and that moisture is what later reveals where the problem is coming from.
Reading the result properly: where is the cause?
After one to two days, it’s time to see what’s happened. Carefully remove the foil and inspect it closely.
Case 1: water on the wall-facing side of the foil
If the moisture is on the side of the foil that was against the wall, the cause is very likely inside the wall or behind it.
"Moisture on the wall-facing side of the foil is a strong indication of water getting in from outside or from pipework."
Possible causes include:
- a leaking external wall or façade
- hairline cracks in the masonry
- damaged or poorly sealed water pipes
- faulty waterproofing in the bathroom or around balconies
- rising damp at ground-floor or cellar/basement level
In this situation, airing the room won’t solve it. A specialist is usually needed to open up the wall, check pipework, or renew external sealing.
Case 2: condensation on the outer side of the foil
If droplets or a thin film of moisture forms on the side of the foil facing into the room, nothing is pushing through from the wall. Instead, the indoor air is the issue.
This points to:
- humidity that is too high inside the home
- airing too infrequently or in the wrong way
- drying laundry indoors in closed rooms
- a kitchen or bathroom without adequate extraction
- lots of plants or aquariums in small rooms
In this case, the aluminium foil acts like a cold surface. The warm, humid indoor air condenses on it - much like a window pane that steams up.
What to do if the indoor air is too humid
If the test suggests an indoor humidity problem, you can often improve things with relatively simple measures.
Ventilate and heat more effectively
- Air rooms several times a day with short, wide-open ventilation rather than leaving windows on the latch.
- Ventilate immediately after cooking and showering, and keep doors shut.
- Don’t let rooms cool down too much, especially in winter.
- Don’t turn the heating off completely; heat steadily at a moderate level.
In well-insulated, airtight homes without mechanical ventilation, humidity can rise quickly. Regular short, intensive ventilation isn’t optional there - it’s essential.
Reduce sources of moisture
If you dry clothes in the living room, keep several houseplants in the bedroom, and barely ventilate, you’re effectively creating the problem yourself.
Useful approaches:
- If possible, dry laundry outdoors or in a well-ventilated drying room.
- If that’s not possible: open the window in the drying room and keep the door closed.
- Cut back on plants in rooms that are particularly prone to damp.
- If humidity is very high, consider a portable dehumidifier.
How to remove stains and mould from the wall quickly
Once you know the cause, the cosmetic issue remains: unsightly stains, often accompanied by mould marks and odour. A simple blend of household ingredients can help in the short term - especially for light, surface-level damage.
The classic option: a vinegar and bicarbonate of soda mixture
One well-known method uses white vinegar and bicarbonate of soda.
- Mix vinegar with a little bicarbonate of soda until well combined.
- Apply it to the affected area using a spray bottle or sponge.
- Leave it to work for 30 to 60 minutes.
- Then gently wipe with a cloth or a soft sponge.
This mixture helps lift discolouration and trap odours. Vinegar works against many fungi and bacteria; bicarbonate of soda supports cleaning as a mild abrasive and helps neutralise smells.
"The vinegar–bicarbonate of soda mix is best for light, surface stains - not for widespread or deeply embedded mould."
If you’re dealing with extensive black patches or badly affected corners in a bedroom, you should bring in professionals for health reasons.
Where the aluminium foil trick reaches its limits
As useful as the test is, it doesn’t replace a building surveyor or other expert. Keep a few things in mind:
- In very old or poorly insulated buildings, several causes can be at play at the same time.
- A single test in one spot only provides a snapshot, not a complete diagnosis.
- If walls are crumbling badly, there’s a mould smell throughout the room, or anyone has health symptoms, don’t spend too long experimenting.
If you rent, it’s best to document marks and test results with photos and inform the landlord early. The longer moisture stays in the wall, the greater the risk of costly remedial work.
Practical tips to prevent damp in the long term
Alongside diagnosis and quick fixes, it’s worth looking at everyday mistakes that cause damp problems in the first place.
- Don’t push furniture tight against cold external walls; leave a few centimetres of space.
- Heat bedrooms moderately rather than letting them become very cold.
- In winter, ventilate briefly but thoroughly rather than leaving windows on the latch all day.
- In bathrooms and kitchens, use extractor fans or a cooker hood wherever possible.
If you’re unsure, a simple hygrometer can help. It shows the humidity level in a room. Values between 40 and 60 per cent are generally considered a good range for living spaces. If the reading is well above that, condensation becomes likely - and with it, the next mark on the wall.
In the end, a piece of aluminium foil costs only a few pence, yet it can point you towards the right choice between “sort it myself” and “call a professional”. For many households, it’s an unexpectedly effective first step against damp walls.



Comments
No comments yet. Be the first to comment!
Leave a Comment