
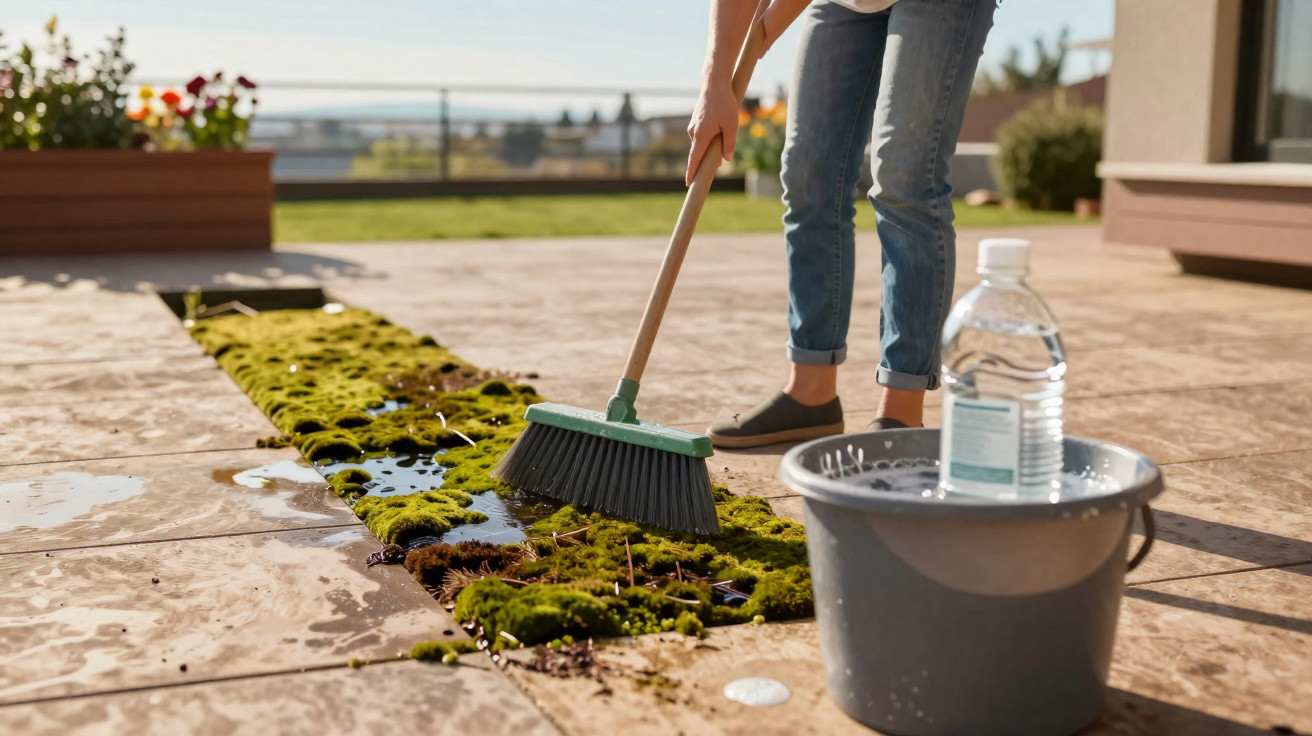
Many homeowners put off cleaning the patio because they picture heavy-duty kit, pricey specialist cleaners and half a Saturday disappearing. In reality, you can often cut down moss, algae and grime with a simple cupboard staple that costs only a few pence.
Why a green film appears on many patios after winter
After months of wet weather, many stone surfaces stay damp for long periods. Standing water, limited sunshine and porous materials create ideal conditions for moss and algae to take hold. The worst-affected spots are often:
- Concrete slabs with a rough finish
- Joints between paving stones
- Areas beneath and behind plant pots
- Shady corners along house walls and fences
It is not just an eyesore. That greenish layer can make steps and slabs slippery. Anyone with children, older relatives, or simply less steady footing will recognise the uneasy feeling when the patio starts to feel more like an ice rink.
That is why many people reach straight for a pressure washer. It shifts dirt quickly, but it can also blast out jointing, spray muck up the walls, and uses both electricity and a lot of water. Others opt for strong chemicals from the DIY shop, complete with prominent warning labels and an often harsh smell.
The surprisingly simple helper: ordinary white wine vinegar
A British gardening expert has relied for years on a far simpler approach: plain, colourless table vinegar, the kind sold in supermarkets for only a few pence a bottle. In the UK she pays around 30 pence and uses about half a bottle for an average patio, so the clean works out at only a few pence.
"This vinegar contains acetic acid, which weakens moss and algae on the surface while also tackling small weeds in the joints."
Compared with many purpose-made patio products, there is no long ingredient list to deal with. Used correctly, it can noticeably brighten the patio in roughly an hour-without a pressure washer and without biting fumes lingering in the garden.
Step-by-step: how to clean your patio with vinegar
You do not need any professional horticultural knowledge for this method. If you have a bucket, a stiff broom and a bit of time, you can start right away.
1. Clear the area and sweep thoroughly
Move chairs, the table, the barbecue and plant containers to the edge of the patio or onto the lawn. The more open the surface, the more evenly the solution can reach every section. Next, use a stiff-bristled broom. Remove leaves, loose dirt and small twigs so the vinegar does not simply soak into debris but can contact the paving itself.
2. Mix the vinegar solution
For most patios, a simple 1:1 mix is enough:
- one part colourless table vinegar
- one part water (not boiling; lukewarm or cold is fine)
Pour the mixture into a bucket or watering can. If your skin is sensitive, wear gloves-not because it is highly dangerous, but because acetic acid can mildly irritate skin.
3. Apply the solution and leave it to work
Spread the mixture generously across the patio. Give stubborn patches and the joints an extra splash. The surface should look clearly wet, but not so flooded that everything immediately runs off.
"Around an hour is enough in many cases for the green coating to loosen noticeably and for small weeds to start to wilt."
While it is soaking in, you can get on with something else: wipe down the garden furniture, get the barbecue ready, or take a break indoors. Strong direct sunshine is not ideal, as it can make the liquid evaporate too quickly.
4. Scrub with a stiff broom
Once the waiting time is up, it is time for the hands-on part. Use the same broom again, this time with more force. Scrubbing helps lift moss remnants, algae layers and the film of dirt. Many patio owners say the difference shows immediately as they work: the slabs look brighter and the joints appear cleaner.
If you like, rinse afterwards with clean water-a garden hose is enough. This helps wash away loosened dirt and any remaining vinegar.
Which patio surfaces suit vinegar-and where you should be cautious
Vinegar works because its acetic acid attacks the cell structure of moss and algae. On sturdy concrete slabs or standard block paving, occasional use is usually fine. With more delicate natural stone, the situation can be very different.
These materials in particular often react poorly to acidic cleaners:
- Sandstone
- Limestone
- Marble
- Old, crumbling jointing mortar
In such cases, vinegar may encourage discolouration, dull patches or flaking. If you are unsure, try a tiny area that is hard to see first. If the stone looks unchanged, you can consider careful use. At the first sign of whitish deposits or a roughened surface, stop the test.
Take care around borders and lawns
The mixture will knock back small weeds in joints, but it does not distinguish between “weeds” and plants you want to keep. If the solution runs into nearby borders or onto the lawn, leaves may yellow and plants can be damaged.
If your patio edge meets a perennial bed, it is better to control run-off and direct it towards a harmless corner. For more sensitive areas, gentler options may be more suitable, such as specialist eco cleaners or regular scrubbing with water alone.
How to reduce moss growth over the long term
A vinegar clean brings quick results, but it does not remove the underlying causes. If you want to keep that green film away for longer, a few habit changes make a real difference.
- More light: Shady zones where hedge growth hangs over the paving hold moisture. Cutting back brings airflow and sunlight onto the surface.
- Better drainage: Puddles after every rainfall show where a fall or drainage route is missing. Even minor work to the joints or adding a small drainage channel can help.
- Moveable containers: Do not leave pots in the exact same place all winter. Shifting them occasionally prevents permanently dark, damp patches.
- Regular sweeping: A quick sweep once or twice a week removes the material moss and algae feed on.
"Small day-to-day changes mean the green film returns much more slowly, making the big spring clean far less of a chore."
Alternative methods: when other cleaners or a pressure washer make sense
Some patio owners prefer products that avoid any issues around acidity. Slower-acting treatments that you apply and then leave to the weather, for instance, may rely on surfactants or specific active ingredients that gradually break down algae and fungi. They typically need less scrubbing, but they do require patience.
A pressure washer is most useful for heavy, ground-in dirt or when you are cleaning a surface ahead of refurbishment. Used regularly on paving joints, however, it can also wash out sand and jointing material. Over time, stones may loosen, water can penetrate, and winter conditions can cause damage.
Practical tips for safe everyday use
A few straightforward rules make the vinegar method easier to use in day-to-day life:
- apply only in dry, rain-free weather
- keep pets and children away from the area during the soaking time
- avoid using it on newly laid paving
- if you live close to neighbours, be mindful of smell sensitivity
The smell is what puts some people off. It usually fades after a few hours or by the next day. If you are particularly sensitive, choose a breezier day so the vapour disperses more quickly.
Why the effort is usually worth it after about an hour
For many households, the biggest advantage is the mix of low cost, easy availability and a manageable time commitment. Most kitchens already have a bottle of vinegar, and the whole job can fit into a Saturday morning without wiping out the weekend.
If you treat your patio once in spring and keep an eye on standing water and build-ups of dirt through the season, you will be less likely to need more aggressive methods. The slippery green winter layer becomes a short, planned task rather than an unavoidable irritation you keep postponing for months.
Comments
No comments yet. Be the first to comment!
Leave a Comment