
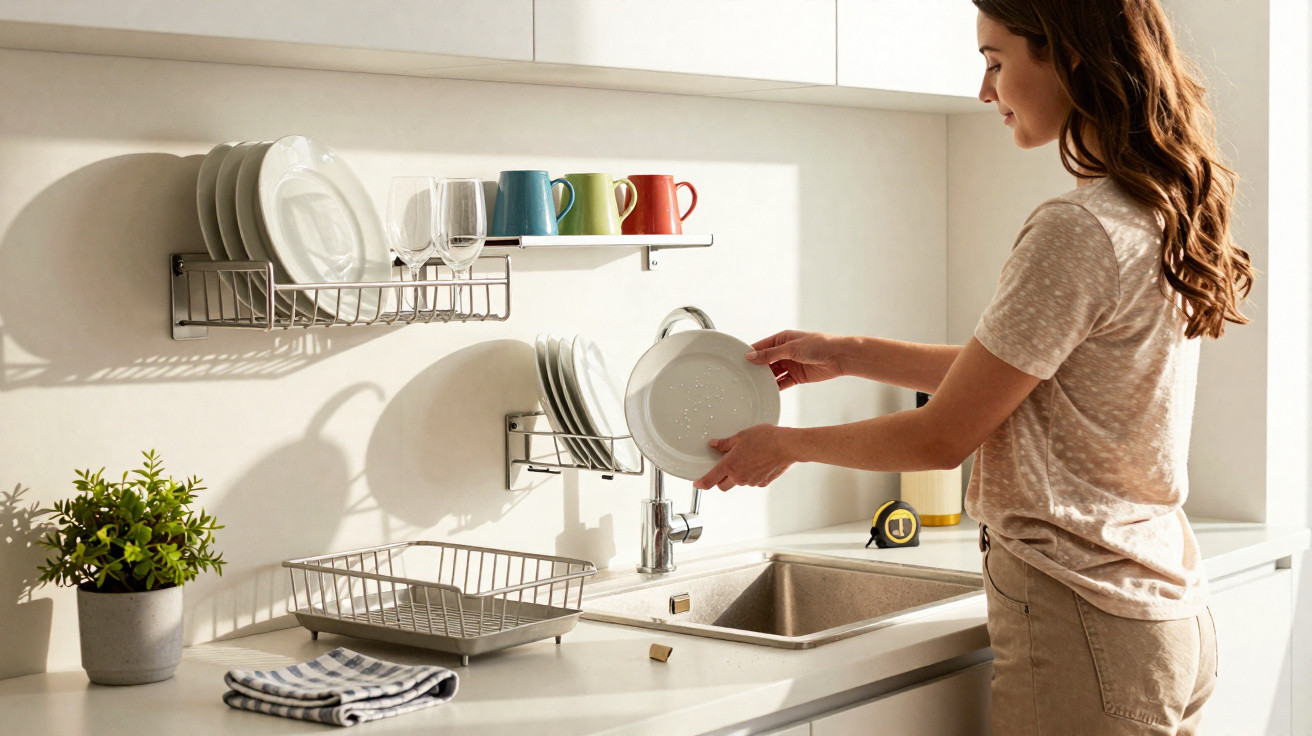
The answer isn’t next to the sink - it’s above it.
Many households wrestle with the same nuisance every day: a traditional dish drainer that hogs the worktop, water marks that seem to appear everywhere, and a kitchen that never quite looks properly tidy. A newer approach tackles the exact spot where space is tightest - not by adding yet more kit, but by rethinking how plates, glasses and cutlery are left to dry.
Why the classic dish drainer is becoming such a pain
For decades, the standard drainer has done its job without complaint. But in modern kitchens - where every centimetre matters - its weak points are hard to ignore.
- Constant damp: Water pools in the tray or ends up straight on the worktop. That leads to water marks, swollen grout lines, or-at worst-mould in corners nobody wants.
- A permanently messy look: Half-washed plates, upside-down mugs, cutlery piled together - the drainer often looks like a building site that never clears. The sink area never feels finished.
- A space hog: Especially in smaller kitchens, it takes up valuable surface you’d rather use for chopping, setting things down or plating up.
- A cleaning trap: Food residue, grease and limescale collect between the bars. If you don’t clean it regularly, you quickly end up with an unhygienic lump in the middle of the worktop.
It’s no surprise so many people are looking for alternatives that suit compact city flats, open-plan kitchen-living spaces, and minimalist interiors.
"Less stuff on the worktop doesn’t mean less convenience - it means using space differently."
The new solution: a wall-mounted dish drainer
The current kitchen trend simply shifts the drying zone up a level. Instead of putting the drainer next to the sink, it’s fixed to the wall - above the sink or to one side.
The principle is straightforward: your worktop stays clear, washing-up dries in open air, and any dripping water falls where it should - back into the sink.
How a wall-mounted dish drainer works
A typical design uses one or more baskets or tiers mounted on a rail system or directly onto the wall. You slot in plates, bowls, glasses and cups as usual - just not on the worktop, but over it.
- Space used intelligently: The area above the sink is unused in many kitchens. A wall rack turns that dead zone into practical storage.
- Improved drying: Air can circulate all around the items and water drains away freely - reducing lingering moisture and, with it, bacterial growth.
- Visually calmer: Depending on the model, some of the washing-up sits partly within a shelf or behind a rail. It looks far more orderly than a bulky rack on the counter.
"Modern wall-mounted drainers combine a dish dryer, shelf and organising aid in a single element."
The key benefits at a glance
- More worktop space: The sink zone stays open, so you can chop vegetables, rest baking trays, or set down mixing bowls without constantly working around a drainer.
- Fewer puddles: Many wall-mounted models channel water straight into the sink. Pools on the worktop and run-off over the edge largely disappear.
- Better hygiene: With no standing water in tubs or trays, there’s less risk of germs and unpleasant smells.
- High capacity: Good systems can easily hold up to 10 kilograms of dishes - enough for stacks of plates, plus glasses and cups for a whole family.
- Easier to look after: Many baskets can be lifted off and cleaned separately. Limescale and grease are quicker to remove than on chunky freestanding racks.
- A smarter look: Brushed stainless-steel styling or matte black metal with clean lines - the right rack can look genuinely stylish and make the kitchen feel more modern.
Which wall-mounted dish drainer suits your kitchen?
Before you buy the first one you see, it pays to assess your kitchen layout and your day-to-day routine.
Step 1: Find the right position
- Measure the wall space above or beside the sink carefully.
- Check whether wall units, pendant lights or sockets will get in the way.
- Make sure you’ll be able to load and unload plates comfortably - so don’t mount it too high.
In very small kitchens, fitting one into a recess or directly beneath a wall cabinet can also work, as long as water can still drain into the sink without issue.
Step 2: Choose the size and capacity
- Single person or couple: A slim model is usually enough, with one tier for plates and a small cup for cutlery.
- Family with children: Wider, two-tier systems are ideal, possibly with extra holders for mugs and breakfast bowls.
- Rarely cook, mostly use a dishwasher: A compact rack designed mainly for glasses, knives and chopping boards is often sufficient.
Step 3: Materials and build quality
Durable, everyday-friendly materials make a real difference:
- Stainless steel: Rust-resistant, long-lasting, and a good visual match for many taps and appliances.
- Hard plastic: Lightweight, often cheaper, and available in different colours. Look for solid finishing so nothing snaps.
- Powder-coated metal: Modern-looking, but the coating needs to be well applied so rust spots don’t develop.
"If you cut corners on material quality, you often pay later with rust marks, wobbly baskets and frustration when cleaning."
Installation: drill or stick?
Many systems offer two ways to fix them: the traditional route with wall plugs and screws, or using heavy-duty adhesive strips or pads.
| Installation method | Advantages | Disadvantages |
|---|---|---|
| Drilling | Very stable, high load capacity, long-term solution | Holes in tiles, more effort to install |
| Sticking | Quick, no drill holes, ideal for rented homes | Lower load capacity, adhesion depends on the surface and the adhesive quality |
If you plan to load the rack heavily on a regular basis - for example with weighty ceramic plates - a screwed-in system is usually the safer option. For lighter use or as a temporary measure, adhesive systems can be enough, provided you follow the manufacturer’s stated weight limits.
Is the switch really worth it?
For many households, moving from a conventional drainer to a wall-mounted rack brings a noticeable improvement. It’s especially valuable if you have limited worktop space, an open-plan kitchen that’s always on display, or a preference for clear, uncluttered surfaces.
If you cook daily and do a lot of washing-up by hand, the biggest gains tend to be:
- more freedom of movement when preparing meals
- fewer damp patches around the sink
- a calmer-looking run of units
It’s different if almost everything goes in the dishwasher and you only wash items by hand occasionally. In that case, a small folding rack on the worktop may be perfectly adequate. The wall-mounted drainer trend mainly suits people whose sink is in constant use day in, day out.
Practical everyday tips for living with a wall-mounted drainer
So the new setup doesn’t become a problem area itself, a few simple habits help:
- At least once a week, wash the baskets and shelves with washing-up liquid and a soft brush.
- Remove limescale marks with a little diluted vinegar, then rinse thoroughly and dry.
- Store sharp knives separately in a knife block to avoid injuries when loading and unloading.
- Position glasses so they’re stable and can’t knock against each other.
If you keep a consistent layout - plates, bowls, mugs and cutlery always in the same places - you’ll find things faster and avoid wobbly stacks.
More order without new appliances
What’s appealing about this trend is that it doesn’t require expensive electrical gadgets, major renovations or any techy gimmicks. A well-planned wall-mounted drainer uses existing space more effectively and tackles an everyday annoyance that many people have simply accepted.
If you’re redesigning or updating your kitchen, it’s worth thinking deliberately about the area above the sink. Even in an existing kitchen, a wall rack can usually be added without much trouble - and a single, well-chosen element can make the whole room feel noticeably more spacious and organised.



Comments
No comments yet. Be the first to comment!
Leave a Comment